
5 Easy Tips To Start Your First Herb Garden | Mind & Soil
At Mind & Soil we believe in helping new gardeners get as comfortable as quickly as possible! Other sites’ blogs about starting a herb garden seemed complex or bloated, and so we want to change that. We want to give new gardeners a quick and easy method for getting into the herb gardening game. We also want to promote a healthy mindset beneficial for beginning gardeners, which is focuses on learning! Below you will find 5 easy steps to get you from a herb garden zero to a herb garden hero in no time!
Step 1: Pick Herbs You Actually Want To Eat
So simple, right? But the reason why we do this is because it provides motivation as you learn something new.
For this step the question you need to ask yourself is, “What are my favourite herbs?” I can help you get started: I love love love basil, rosemary, oregano, and mint, so I’ve grown those in years past.
Take a pen or pencil and write down what your favourite herbs are. Terrific - you’ve just created your first shopping list, so now it’s time to head to your local nursery.

Picture of a local nursery
When at the nursery all you need to do is find their garden centre and look for the herb seedlings on your shopping list. The seedlings you buy will be ready to transplant into new, larger containers right away. There is no need to harden them off or anything like that! Speaking of containers, on to step 2.
Step 2: Pick A Container For Your Herbs
Your herb babies need a home! Buy something that allows them to stretch their legs. Because herbs are typically small you can get away with smaller containers or grow bags. Containers between 3 to 5 gallons (7.5L to 19L) will suit you well.
For a single herb plant you can use a 3-gallon container (7.5L). By that logic, if you bought five herbs then buying five 3-gallon containers works. However, if you think you can fit more in a container then give it a try! The first year is all about experimentation and seeing what works!
You may be asking, "Why containers or grow bags?" And that is because as a beginning gardener you need to learn your space! Having containers or grow bags in your first year allows you to do three things:
- Survey your space allowing you to assess where to set up more permanent structures in the future
- Move your herbs to the sunny spots, which is important to give your plants a chance at success
- Instead of investing in expensive permanent structures with limited knowledge of your space, you can grow herbs and learn at a fraction of the cost!

Herb container in a shady spot

Container of herbs in a sunnier spot!
Your first garden should be about learning your space, and using containers allows you to do this! This is because as you learn how the sun moves through your space you can move your containers to where it's sunny. Instead of buying a permanent structure only to find out its placement is where it is shady half the time! You learn, have more initial success, and do so at a smaller price tag. Win-win-win!
Step 3: Pick Up A Potting Mix
Your herb seedlings need soil to grow in, so pick yourself up some potting mix. Like grocery shopping though, make sure to look at the label! You want a potting mix that is high in organic matter or compost.

Potting mix with high organic matter!
Not every potting mix is the same. Look through all the options and choose the one with the highest amount of organic matter or compost. I prefer Sea Soil. In the limited time I’ve been gardening it’s worked really well for myself.
Step 4: Get Worm Castings And Superfood
Okay, your herb babies are in a great potting mix. Terrific work so far! But now is when you give your herbs the boost of nutrition they'll need to THRIVE. Think of this step like a world-class marathoner fuelling herself during a race. Could she complete the race without taking in fuel like gels and Gatorade? Yes, because she's trained a lot and has a great base-level of fitness. But she wouldn't thrive and compete for the win. By having the gels and Gatorade she's taking in the nutrients her body needs to thrive. That's why she eats during the race: to achieve her best result.
Potting mix is equal to the marathoner's base fitness in the above example. Worm castings and 4-4-4 superfood are equal to the gels and Gatorade. Both will give your herbs the boost of nutrition they need to THRIVE.
Worm castings are the output of feeding organic matter (compost) to worms! They love it! They gobble it up. As the organic matter travels through the worm’s digestive tract it’s coated in beneficial bacteria, enzymes, and microbes - all which plants love!

Worm castings (and worms)!
4-4-4 Superfood gives your plants all its macro- and micro-nutrients to grow big and strong. Herbs and plants extracts the nutrition they need to grow from the soil. This is why it is important for the soil to have the proper nutrients in it. By buying worm castings and 4-4-4 Superfood you're ready to transplant your herbs!
Step 5: Transplant The Herbs Into The Containers
Alright! We’ve got everything we need. Now it’s time to get our hands dirty! WOOHOO!
First step is to put your potting mix into your containers. You’re going to want to fill the container up three quarters to the top.

Container with potting mix filled three quarters full
From here we will dig a hole in the middle of the container. The hole should be large enough to fit your entire herb seedling comfortably. Before moving your herb into its new home sprinkle a handful of worm castings into the hole.

Handful of worm castings
Immediately after adding the worm castings, sprinkle 1 tablespoon of 4-4-4 superfood into the hole.

One tablespoon of 4-4-4 superfood
Mix the two ingredients together to ensure it’s integrated into the soil. Now carefully take your herb out of its seedling container. We are about to graduate it into its forever home!
To transplant your herb, carefully flip it upside down. Place your hand around the outside of its container. You should feel the herb against the web of your thumb and index finger. From here gently squeeze and shake the container. This should help to loosen the herb and soon enough it should slide out of the container and into your hand. You will likely see roots looking like they’ve been growing into the shape of the container you just took it out of.
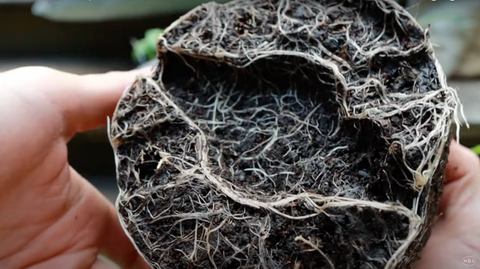
Seedling roots
Now gently massage the roots to loosen them up. This will let the roots know that they’re ready to stretch their legs! They’ll be able to start growing into the new space you’ve provided them with, which will help them grow big and strong!

Loosened seedling roots
Try not to rip the roots, so simply press against the roots instead of tear at them. We want them loosened but not ripped apart!
Now place the herb plant into its new container, right into the hole you’ve just dug. Once in the hole, backfill the hole with the dirt you took out while diggin it. Pat down the area at the base of the plant.
We’re almost done!
Lastly, give your herb plant another handful of worm castings and 4-4-4 superfood at the base of the plant. Once again mix the worm castings and 4-4-4 superfood into the soil. Give your herb a big drink of water and you’re set!
Repeat this process for all the herbs you purchased.
As you can see, starting a herb garden doesn’t need to be complex. What’s important is that you get something that works for you. As a new gardener, using equipment you can move, such as containers or grow bags, will help you learn your space. This is because you will be able to adapt by moving your containers as you learn more about your space. I used this approach in my first year and I loved it. I hope you are able to take something away from this and be successful in planting your first herb garden!